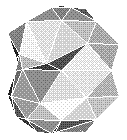
To create the paper balls add a new sphere (Object, New, Primitive and choose Sphere) and give it 8 circle and 8 vertical sections. Enter Drag Points mode (Mode, Drag Points) and drag the points about until the object looks like a screwed up piece of paper in the perspective view (see below).
 When you are satisfied edit the ball's attributes (Functions, Attributes). Click on Phong Shaded to turn it off. This makes sure our ball doesn't have corners that are too smooth. You can change the base colour to the main colour your paper balls are going to be but I left mine as white. Click the car button and move the paper ball out of the way. Now reload the bin and carpet (Object, Load and select the file name you saved them as). Move the paper ball to the bottom of the bin (with the car button) using all of the Imagine views for reference. Click the button in the left of the Imagine window with a picture of scales on and drag the mouse to scale the paper ball. Hit your Spacebar when you're done. Copy (Object, Copy) and Paste (Object, Paste) the paper ball. Now move, scale and rotate (the red and blue arrows button) the new ball until you are happy. Repeat this many times until you have enough balls to at least half fill the bin. Make sure none of the paper balls are partially outside the walls of the bin by checking the perspective view.
You can select individual balls and change their base colour so that some of the paper balls are from coloured paper. This make the image more interesting and it is easier to see the different balls. Now choose your camera angle and zoom and perspective values as described in Step 2 using the A, Z and P buttons. Select the Bin and then click Pick, Pick All. Click States, Group then save the group Object, Save.